
When I was a kid, my mum used to make a traybake made with melted mars bars and puffed rice, all simply mixed together and let to set in the fridge for a couple of hours. It was simple, quick and really, really indulgent. Definitely a children’s favourite and a party ‘must have’.
The other day I was looking for some cereals at the supermarket, and all of a sudden that memory hit me. It was so good. I still remember the caramel-ly flavour and the fingers getting completely sticky. That was the best part. Each family would have their own ‘recipe’, with a different consistency, a different flavour, and a different stickyness. No matter what, it was always delicious.
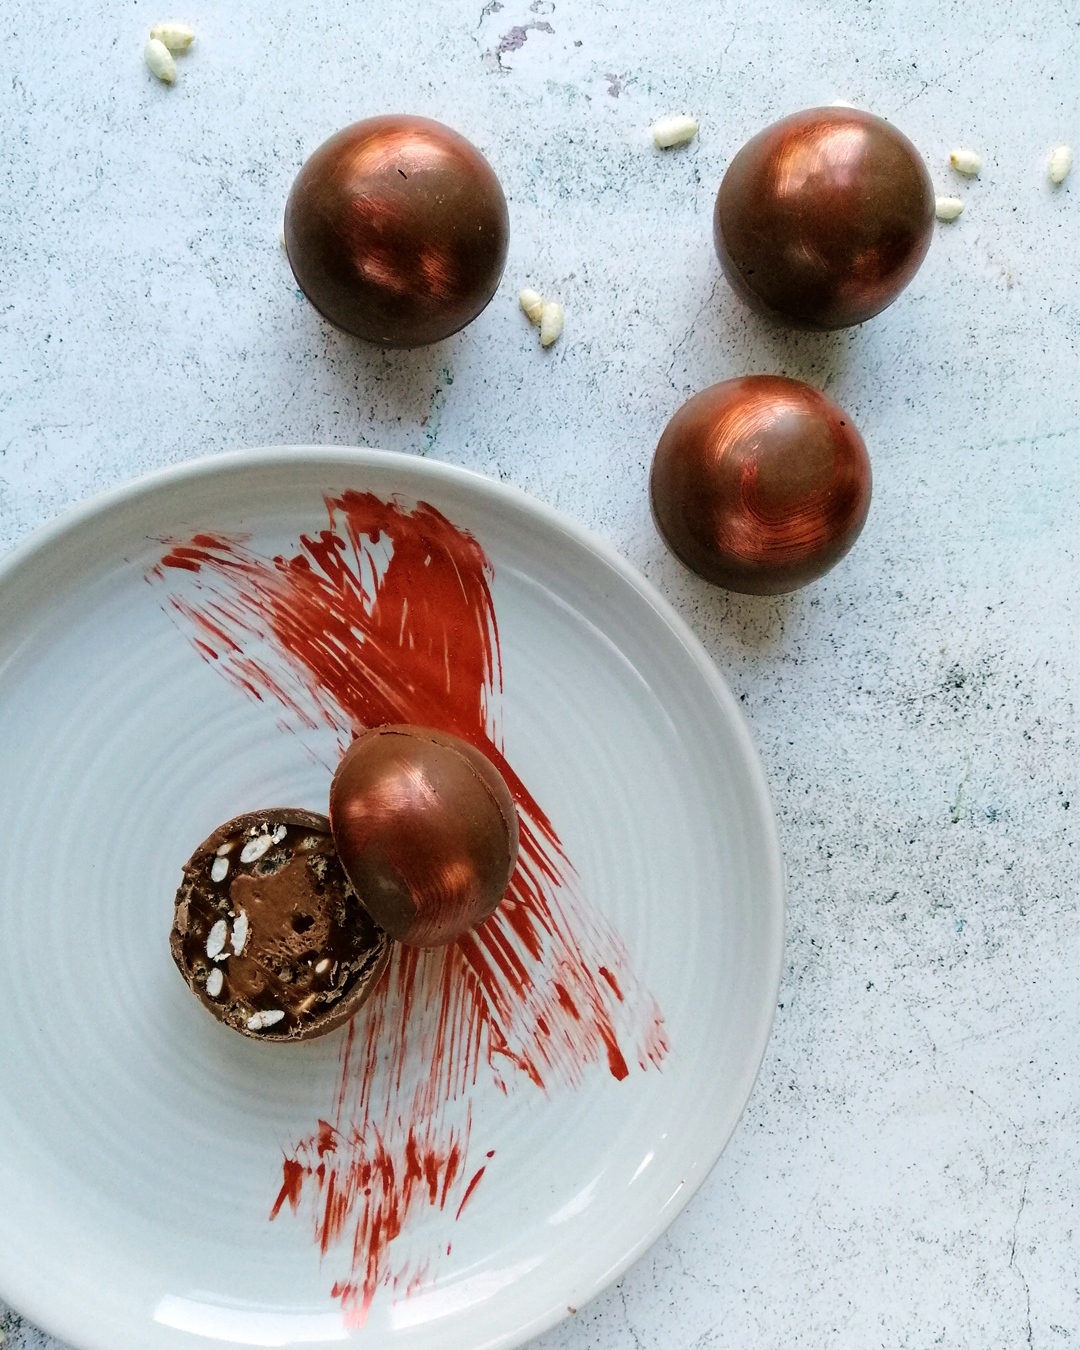
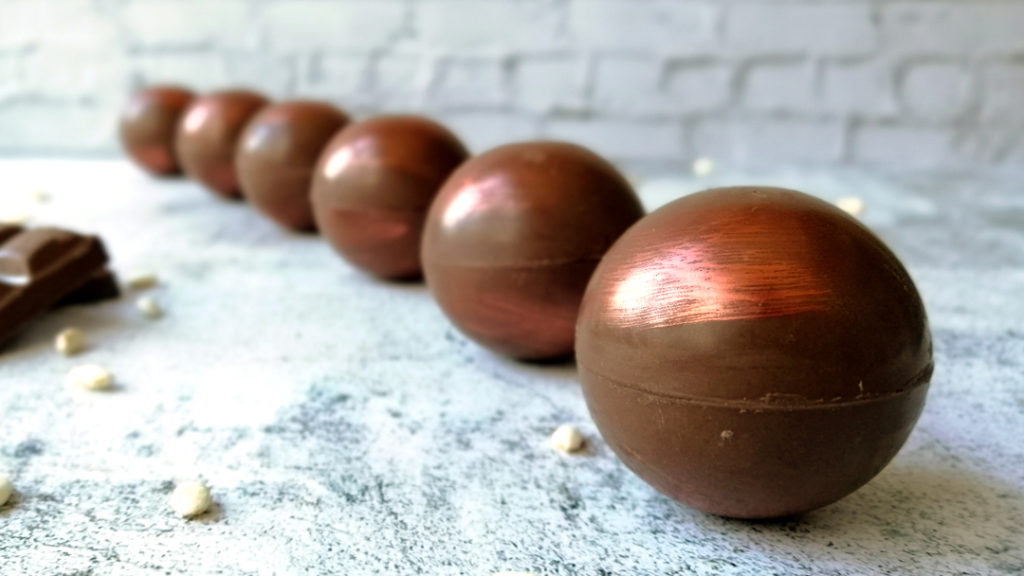
I decided to re-create that delicious memory in a re-worked version (and a bit more challenging) and to actually re-make every single element the you would usually find inside a mars bar. At the same time I wanted to come up with something you could eat in a few bites and hold in your hand without being too messy. Tasting delicious but also looking good, resembling planet Mars, and with a name that reminded me of my mum’s mars cake: marses.
My marses recipe consists of a melt-in-the-mouth nougat middle, a milk chocolate and caramel ganache mixed with both soft and crunchy puffed rice, and last but not list a milk chocolate shell that covers all that goodness.
If the description or the list of ingredients sound scary, fear you must not: this recipe is not as difficult as it looks or sound. It just requires a bit of patience. Most of the components can be made up to one or two days ahead, which allows you to work around your schedule to make your own marses. Believe me, you will be rewarded with the definitive indulgent treat.
Just one last thing to say: get ready to wow your guests and be asked for the recipe.
Looking for more challenging and show-stopper recipes? Serve my raspberry and lemon white chocolate mousse tart at your next dinner party, wow your family and friends with a sofisticated vanilla and banana dome or entertain them with the perfect cappuccino fondant.
Ingredients
FOR THE NOUGAT CENTRE
- 60g caster sugar
- 25g glucose syrup
- 20g honey
- 20g water
- 1/2 tsp malt syrup (optional)
- 1/2 tsp vanilla extract
- 25g milk chocolate, chopped
- 10g cocoa powder
- 1 egg white
- 5 drops of lemon juice
FOR THE MARS CAKE MIX
- 150g milk chocolate (about 30 to 35% cocoa)
- 75g double cream
- 180g caster sugar
- 120g double cream
- 60g butter
- 15g puffed rice (plain)
- 25g rice crispies
FOR THE CHOCOLATE SHELLS
- 300g milk chocolate (30 to 35% cocoa)
- food paint of your favourite colour to decorate (optional)
SPECIAL EQUIPMENT:
- sugar / food thermometer
- electric whisks / stand mixer
- small semisphere silicone / plastic mould
Method
MAKE THE NOUGAT (can be made up to 2 days ahead)
- Combine the water, sugar, syrups, and vanilla extract in a small saucepan and bring to a boil over a medium heat. This will be your caramel for the nougat. Meanwhile, melt the chocolate in a microwave or oven bain-marie and keep warm.
- When the caramel boils, give it a small stir to dissolve any lumps. Stick the thermometer in and bring the syrup up to 150°C. Put the egg white and the drops of lemon in a medium metal or ceramic bowl, and whisk it to soft peaks.
- Once your caramel has reached 150°C, pour the hot syrup onto the egg white slowly and steadily while whisking on low speed. Once done, raise the speed to medium-high and keep whisking for about 3 to 4 minutes until you get a thick consistency. Using a spatula, fold in the cocoa powder and melted chocolate until fully incorporated. Leave to cool at room temperature and covered with cling film touching the surface for 2 hours, before transferring to the fridge until ready to use.
MAKE THE MARS CAKE MIX (can be done one day ahead)
- Make the chocolate ganache: chop the chocolate and transfer to a bowl. Bring the double cream to the boil over a medium heat. As soon as it bubbles, pour the hot cream onto the chocolate, cover and leave to sit for 3 minutes. Slowly stir with a spatula, starting from the middle and moving towards the sides until the ganache is silky and shiny. Leave to cool at room temperature.
- Make the caramel sauce: take a heavy bottomed saucepan and make a dry caramel. Sprinkle the sugar in an even layer and heat on a medium heat until it starts melting. At this stage, you can stir it a little to melt evenly but try to touch it as less as possible. When the sugar has become liquid, keep heating it until it reaches a nice amber colour (up to 160°C if you are using a sugar thermometer). Remove from the heat, carefully pour one third of the double cream in and whisk to incorporate. Be careful as it will bubble a lot and it might produce hot splashes. Keep whisking and add the rest of the double cream, followed by the butter. Keep whisking until fully incorporated. Put the sauce back on a medium heat and bring it up to 118°C, stirring to prevent it from catching to the bottom of the pan. Transfer to a bowl and leave to cool completely.
- When both the ganache and caramel have cooled down to room temperature, pour the caramel sauce into the ganache and slowly stir until fully combined. Add in the puffed rice and rice crispies. Set aside in the fridge until ready to use.
MAKE THE CHOCOLATE SHELLS
If this is the first time you temper chocolate, it is a process that involves melting the chocolate by heating it up to a certain temperature, then cooling it down and slightly re-heating it again. The process aligns the cocoa crystals and transforms your chocolate into a very hard and shiny one that sets very quickly. Le Cordon Bleu provides a very simple explanation of the “seeding method” process and temperatures.
- Melt 2/3 of the chopped chocolate over a bain-marie using a food thermometer or in the microwave in 20-seconds blasts (to make sure you don’t overheat it) and bring it up to 45°C. Remove from the heat, add the remaining chocolate and leave it to melt, stirring from time to time to cool down the mixture. Once all the bits have melted (if there are still some, remove them) and the mixture has reached 26°C, put it back onto the bain-marie and bring up to 29°C. This last step will be super quick. Test a smudge of chocolate over a piece of parchment or a knife. The chocolate should literally set and harden in 5 minutes.
- Prepare your moulds. If you want to add some colour to your spheres (I used metallic bronze food paint), just paint the inside of the empty moulds and leave to dry a few minutes before adding the chocolate (see note below). The colour will stick to the semi spheres when you unmould them. Transfer to the fridge to set.
Note: to make the shells I recommend you first paint a thin layer of chocolate inside each semi sphere (my mould has 15 in total) and then add a teaspoon more and spread it around to an even thickness. Once done, flip the mould upside down over some baking parchment and let any excess chocolate drip down. Clean and tidy the top edges of each semi-sphere from any excess chocolate using a palette knife or a metal patula before transferring to the fridge to set.
ASSEMBLE YOUR MARSES
- Take the nougat and mars cake mixes out of the fridge and let them come to room temperature for about 1 hour. Take the mould with the chocolate semi spheres and fill each one with the mars cake mix. With your index finger, poke the middle of each semi sphere to make a small hole about 1/2 cm deep. Pop a small quantity of nougat mix inside the hole and using a palette knife or a metal spatula, flatten the surface to remove any excess of mix, so you end up with perfectly filled semi spheres. Put back in the fridge to set for 2 hours.
- Unmould the half spheres, wearing some rubber of latex gloves to avoid leaving finger marks on them. Using a flat warm surface (like a heated bottom of a pan) lightly melt the flat side of two semi spheres and glue them together to form a full sphere. With the blunt edge of a knife, remove any excess chocolate oozing out. Repeat with all the oremaining semi spheres and refrigerate until ready to eat.